Notes on Technique Considerations when Instructing on the Flywheel
Now lets look at all of our forward crossover skating technique issues in rough order of importance (If you have not read the Treadmill Training Focused Page, you should read that before reading this one regarding instructing on the Flywheel. This is similar but more complex and understanding of how we instruct and what we focus on while instructing on the treadmill will make these flywheel instructing points easier.).
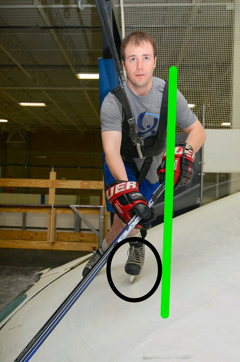
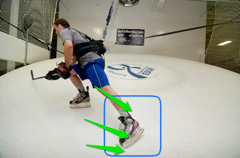
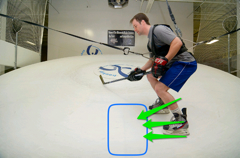
In the photos above notice how the left side of the body becomes oriented almost as if it is being pressed up against a wall as the player recovers with either leg. We call this the “inside leg wall”. It is most clear on the first photo, but it does apply when the outside leg comes across as well (as shown in the second photo). Also note that this recovery location for both legs is underneath the inside hip.
Weight Distribution – When executing crossovers it is critical to be able to get the weight to the inside leg. Once all the weight is on the inside leg it is easy to lift the outside leg off the ice and bring it across. On the wheel we coach players to get their weight to “the inside leg side”.
Basically this means that the weight is over where the inside leg would be during a glide and stays in that position no matter which leg is gliding or pushing and which is recovering. In other words, the weight should be over that location no matter what part of the stride we are in.
Of course we don’t want them to lean too far toward the middle, to the point where they are on the verge of falling toward the middle of the wheel. If players have not positioned their weight correctly, the under push with the inside leg will be weak. They will spend much more time on the outside leg as compared to the inside leg where we will see small weak “hops”.
A cause of this problem is simply lack of comfort on the outside edge. Players need to get their weight over the outside edge of that inside leg and be comfortable spending time on that. This can be worked on via simply gliding on the inside leg with and without the bar.
Knee Bend – As with any skating stride for hockey, we need to decrease the height of the hips above the ice so that we can maximize horizontal force from each stride thrust. This means deep knee bend. We want players to be in the ballpark of 90 degree knee bend (or slightly lower, if players are capable). Keep in mind though that simply due to the nature of leaning into the turn on crossovers, the inside leg should have slightly deeper knee bend than the outside leg.
Unless players are near 90 degrees of knee bend, we should be constantly monitoring their knee bend and giving regular reminders to them to work on doing reps with deeper knee bend. Except in rare circumstances with skaters who naturally have very deep knee bend, instructors need to remind players on knee bend more than any other thing.
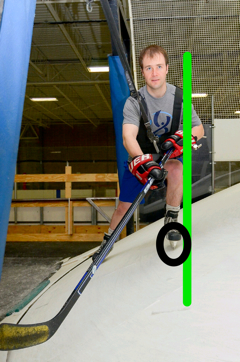
Posture – Correct posture is defined by the concept of straight line extension.
- Full extension is when the pushing leg is all the way straightened out (true for crossovers and straight away stride) so that a straight line could be drawn from the hip through the knee to the ankle.
- The concept of straight line extension simply continues that line up through the shoulders so that the skater’s torso matches the angle of the extended leg.
- In the forward stride, we look for an exactly straight line in the straight line extension concept.
- In crossovers there is a bit of leeway to have a slightly forward lean of the torso but we still would work toward being close to having a straight line from the ankle to the knee to the hip to the shoulders at full extension.
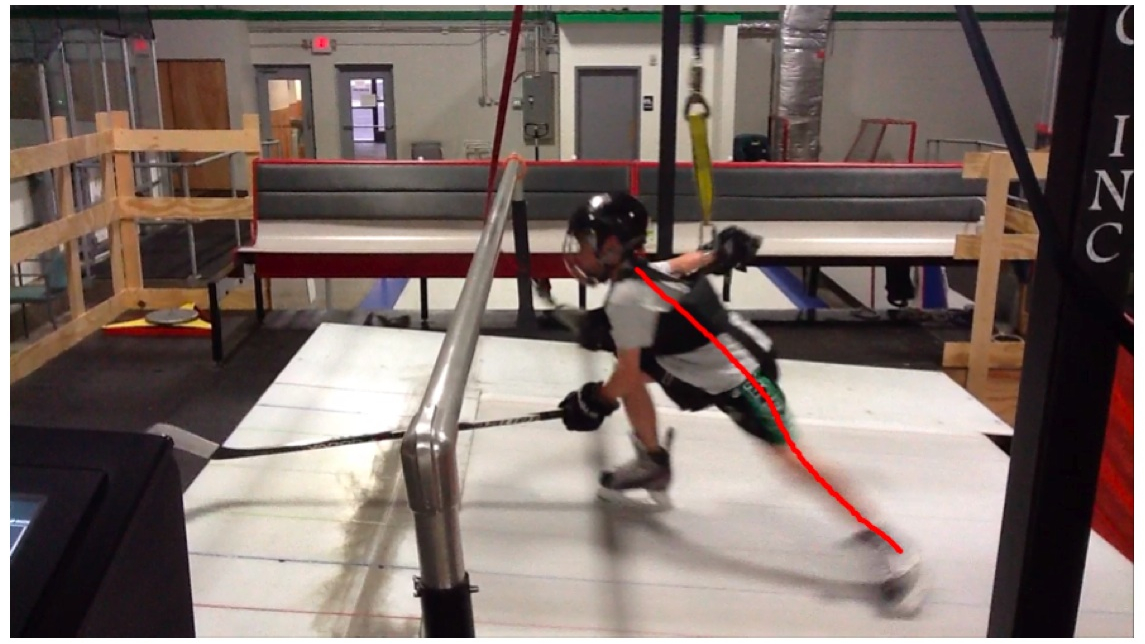
The concept of straight line extension is shown here on the treadmill, but it is exactly the same concept on the wheel. Straight line extension for perfect posture is more critical in the straight away stride than in crossovers, however.
Extension – With both legs, we promote full extension until the legs are straight.
Thrust Angle Difference – We seek to have both legs (inside leg and outside leg) push in the exact same direction in our crossovers.
- This direction is dependent on the speed and angle of the wheel, but should never be nearly straight to the back or straight to the side.
- Correct thrust angle (or push direction) is a combination of back and to the side that forms a diagonal and, again, the exact direction depends on speed and angle.
- We should strive to have the two pushes (inside leg and outside leg) be nearly identical in terms of where they start and where the finish.
These photos are recycled here, this time to give a visual to the recovery location described below.
Recovery Location and Foot Angle – To promote good ongoing weight distribution over the “inside leg side” and to attempt to get both legs starting their pushes from roughly the same position, we must pay attention to the position that we are recovering to. Essentially we should be recovering to a spot that is right underneath the inside hip and possibly slightly forward of that spot. This is true for both legs so the outside leg should come all the way across to under the hip of the inside leg.
Another common mistake associated with recovery is to have the toes turned “up the wheel” when the recovering foot is set down.
- In order to make our stride thrusts in a way that allows each blade’s edge to track in its groove, we must turn the toes downward slightly throughout the process.
- Skate Blade Edges must track in the groove that they cut into the ice for for us to have a smooth stride.
- If skaters are doing this wrong, you will hear a scraping noise at the moment that each foot is set down and this dynamic will throw off their stride.
- At first it is somewhat scary for most kids to turn the toes down, so they must learn this gradually. A return to using the bar may be necessary to create the proper habit before trying again without the bar.
Note: In backward crossovers it is correct to include “inside leg reach” where the leg toward the middle of the circle reaches in to the center of the circle and pulls underneath to propel the skater. In forward crossovers, we DO NOT do this. For forward crossovers, we simply recover both legs under the inside hip.
Relative Timing of Inside and Outside Feet – The inside leg and the outside leg should make roughly equal pushes both in terms of where they start and where they finish and in terms of how long the skater is on each foot. Shorter time on the inside leg is indicative of lack of comfort on the outside edge. We need to correct this by isolating the outside edge of the inside leg with “glide” drills if a player isn’t showing progress by just working on this within the crossover technique.
Also, when working on stride technique it is usually better that skaters err on the side of slowing down the extension process to make longer strides. When technique is good we can try quicker feet crossovers. Again, it may be necessary have the skater return to using the bar to work on their outside edge skill.
Hip Alignment – Some players have a tendency to turn their hips toward the middle of the wheel during crossovers. This makes it very difficult to push with a rearward direction to full extension.
- Players should be coached to keep their hips square to the mirrors in front of them on the wheel.
- This facilitates the range of motion necessary to make crossover stride pushes that are both lateral (creating the turning motion) and rearward (so they produce forward force allowing them to maintain speed or accelerate).
- If players are working on hard accelerating crossovers (Bursts) it is advisable to even turn the hips slightly to the outside of the turn which will facilitate more rearward stride thrusts which are needed to explosively execute crossover strides.
Arm Motion – Arm motion should be natural, fluid, and should not interfere with the rest of the stride. Beyond this, we should not be overly concerned with arm motion within skating.
Some coaches teach that we should reach straight forward and straight back with the motion of the arms in the stride. We do not. In skating, our thrusts are not straight to the back (as in the running stride) but instead include a lateral component (especially true for crossovers) and as such it is not counter productive to have a lateral component to skaters’ arm motion.
- In fact just as our strides are both rearward and to the side, our arm motion should be forward and to the side opposite the stride thrust.
- In crossovers this is true of the outside arm with the inside arm having a subdued motion.
- Arm motion that is straight side-to-side is counterproductive. So is any arm motion that is not consistent or is out of rhythm with the stride.
- Any of those counterproductive conditions should be corrected.
Vertical Motion – Many skaters who are not comfortable on their outside edge will “stand up on it” during the stride. In other words, when they get to their inside leg, they stand up by straightening the knee and then “fall across” this leg toward the inside of the turn. This leads to wasted up-and-down motion during the skating stride. Players should seek to have zero up and down motion at all times during the stride as vertical motion is wasted energy and hurts the smoothness of the stride. We will teach players to stay low and when they do straighten their legs out, they do so while they push their bodies horizontally, not vertically.
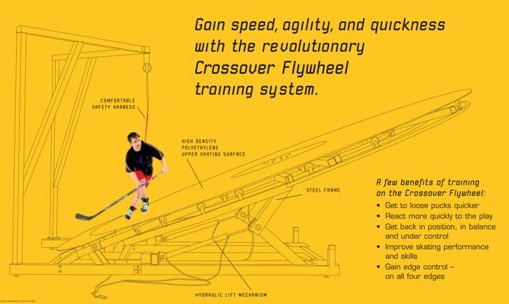
Angle Use – With the Flywheel, the angle is not used to make the training tougher. Instead it is used to simulate a tighter turn (high angles) or wider turn (low angles). It is also kept low to make things easier for beginners.
- Yet, for more skilled players, the lowest angles can actually be harder than medium angles.
- The very high angles are the hardest in terms of trying to stay balanced on the wheel.
- Similarly, the tightest and fastest turns on the ice are the hardest when doing crossovers. Simulating these tight fast turns with the wheel uses the highest angles on the wheel and this is the hardest… but it isn’t necessarily because this leads to the hardest workout. It is simply the hardest to execute technique with balance.
- With that said, we should vary angles and speeds to make sure skaters are well prepared for any turn on the ice.
Note: When trying to raise the Flywheel’s angle, at times, the Flywheel will stick on one side and continue going up on the other.
- When raising the Flywheel we must watch it to check if this is happening.
- If one side gets too much higher than the other it puts a lot of strain on the Flywheel’s frame.
- When this happens you can keep going for about a half second to see if it will self-correct during the lifting process.
- If it does not self-correct, lower it back down until the two sides are level and try again.
- If when trying again a few times it does not get past the point where it is sticking, just use a lower angle level for the time being and alert Andy who will fix it.
- (A similary problem happens at times with the treadmill, but the treadmill shuts the lift system down to protect itself. If this happens just try to continue using the treadmill at the angle where the lift system stopped and contact Andy.)
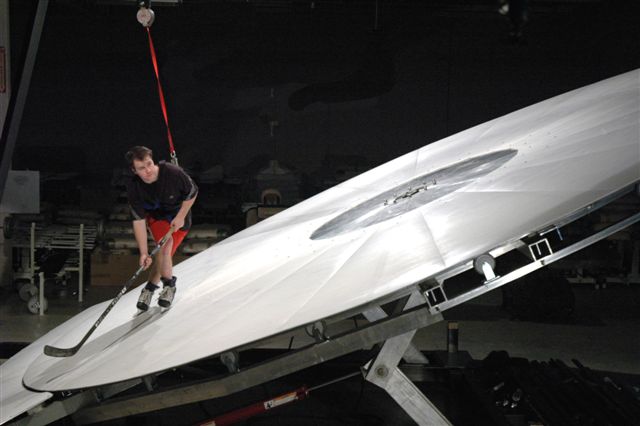
Exertion Level – A skater can make any speed and angle setting on the wheel a full out sprint or no work at all. This is due to the “Bottom Center” quality of the skating area on the wheel and we’ll talk about that next. Here however, just keep in mind that if a player goes into a maximum exertion burst, he will move forward on the wheel, but will not skate himself off of it. Similarly if the skater stops moving their feet and just glides, they will move backward, but won’t go off the wheel so they can rest at any time in this way.
Skating in the Bottom Center – When the wheel is tilted up at any angle there is a bottom center point from which any motion around the wheel would be uphill either way. This is the main area where players skate.
- If the wheel is turning and the player is skating at medium exertion, they will be roughly in this bottom center area.
- If they are pushing things really hard, they typically will move forward of this bottom center area to a point where they are skating slightly uphill. This uphill nature balances the extra effort of their higher exertion level so they wind up in an equilibruim point which is “ahead of bottom dead center”.
- Likewise if they push themselves less or glide, they will move backward from the bottom center to a point where they are essentially facing downhill. The extra assistance of the downhill causes the player to again find an equilibrium that is “behind bottom dead center”.
Toe Snap – As both legs approach the end of extension we should roll pressure toward the toe of the blade to add a little extra push. It also allows the blade to get a cleaner release from the skating surface during crossovers which helps players to get a smoother overall stride process. Some coaches refer to this as “toe snap”
Progression – Note that the progression on the wheel is really two progressions… one for right over left crossovers and one for left over right crossovers. Also note that we typically alternate direction on each skate to ensure players get equal reps on both sides.
- Deep Knee Bend (DKB) Hockey Position Glide
- DKB Slaloms
- DKB Single Leg Glide (one leg then the other)
- Basic Crossovers at low speed
- Basic Crossovers at medium speed
The above 5 steps can be done in the first skate (each direction) in most cases
- Basic Crossovers at medium speed and medium angle
- Basic Crossovers at medium speed and medium angle with one hand
- Basic Crossovers at very low speed and low angle (choose angle based on player performance) with no hands
- On this one we typically are speeding it up as the player goes
- At first we are just looking for tiny steps indicating proper weight transfer to the inside leg and as we speed it up they start to incorporate more and more extension
- Players are coached strongly here to keep their toes pointed slightly downward
- Basic Crossovers at medium speed and medium angle
- Skating Stride technique corrections (before moving to more challenging settings we make lots of corrections here at medium speed and medium angle)
- Basic Crossovers at high speed and medium angle – ensuring good form
- Basic Crossovers at medium speed and high angle – ensuring good form
- Basic Crossovers at high speed and high angle – ensuring good form
- Advanced skating and or multitasking techniques
- Bursts
- Puckhandling
- Backward
- Transitions
- Duckwalks
Backward Skating, Transitions, and Multitasking – Many of the same concepts which apply to forward crossovers apply directly to backward crossovers on the wheel.
- One key difference between forward and backward crossovers on the wheel is that fact that we now must point the toes in an uphill direction so that the skate blades (now moving backward relative to the wheel) can track at a downhill angle during each stride push.
- Another key difference between forward and backward crossovers is tied to the inside leg. The outside leg operates on a similar principle to what we see with forward crossovers which is recovery underneath the inside hip and good extension to the outside and away from the direction of motion (in this case the direction of motion is toward the back of the body as we are skating backward). The inside leg, on the other hand, recovers way toward the middle of the turn and does most of its work by pulling underneath the body with a small extension underneath.
- Inside leg reach and toe angle are key differences in backward crossovers as compared with forward crossovers.
Progressing into comfort with backward skating is tricky though as the plastic on the wheel tries to continually pull the feet toward the front of the body and it is hard to stay balanced. We use the bar for quite a while during the acclimation process to backward crossovers on the wheel. Even with the bar, players struggle for a while as their feet get pulled under it. When the feet get pulled under it, the player usually has turned their hips and their skate blades too far toward the middle of the circle (uphill) as opposed to keeping them more square to the direction of motion.
Once players can execute backward crossovers with good inside leg reach, minimal arm exertion for holding on to the bar, and the flywheel at medium speed and angle, it is time to work through the process without the bar. As with all early stages of acclimation to the Flywheel we start slow and low working on weight transfer, balance, and knee bend. As players pick those up they should begin to make their strides bigger, here focusing on outside leg extension and inside leg reach-and-pull.
Players who can execute quality backward crossovers on the Flywheel can pick up transitions quickly. Every transition on the Flywheel involves going heel-to-heel or “mohawk” toward the center of the wheel. With our normal way of hooking players up to the safety restraints, they would get tangled when they did this, so we use an accessory which we add to the restraing system which creates a single point of attachment toward the outside of the turn. This allows them to be free to rotate toward the inside of the turn.
The skill of executing these transitions is all about getting the weight to the outside leg (whichever way they are going… left, right, forward, or backward), lifting and turning the inside leg around, and at the same time turning the hips toward the center of the wheel. This will get you to the mohawk or heel-to-heel position. To complete the transition, simply transfer the weight to the leg that just turned around (the new outside leg), continue turning the hips the rest of the way around, and pick up the old outside leg and turn it around to the new direction. Of course to do this right, we have to execute our skating stride on both sides of the transition, one side is forward and the other is backward.
Another maneuver that exaggerates the mechanics of transitions is the duckwalk. Essentially this involves getting into the mohawk or heel-to-heel position as described above and staying in it. Players propel themselves during duckwalks by making small stride thrusts while rocking your weight between the feet.
Multitasking can be done in all phases of skating on the wheel (forward, backward, transitions, and duckwalks) and simply involves adding a puck. Advanced multitasking can be done with advanced skating phases and / or puckhandling movement patterns to make the puckhandling aspect more complex. Borrowing movement patterns from the stationary puckhandling training we do on the “grids” in the handskills area is a good place to start.
Keep in mind that we cannot tolerate a significantly degraded stride during puckhandling, so we must not give pucks to kids who are not ready during their training on the wheel. In order to get the puck, they need to have good enough stride habits to maintain them during puckhandling.
Also, use pucks as a reward for good skating. They should not get a puck right away during a skate, but instead the instructor should wait until the player is executing their best stride and then give them the puck as a reward. The opportunity to shoot for a “Circus Shot” is treated the same way. Players should skate and stickhandle well with the head up before being allowed to shoot for the nets and for Circus Shot glory.